


Tiana’s Bayou Adventure doesn’t have a Standby Line. Instead, if you want to ride it, you’ll need to either pay money for Genie+ or try to secure a free Virtual Queue Boarding Group.
It can be tricky to get either – but we have step-by-step instructions for how to ride Tiana’s Bayou Adventure that can help to increase your chances of getting a ride.
Let’s get into it:
Update! Major changes are coming to the Genie Plus System, effective July 24, 2024.
Changes include:
If all of this sounds like a foreign language to you (which, to be fair, Disney does sometimes feel like it uses its own language!), we recommend you check out a couple of primers to get you up to speed before you dive into the nuts and bolts of how to ride Tiana’s Bayou Adventure. Check these out first, then head back here to get the details:
There are 2 ways to ride Tiana’s Bayou Adventure
Before we get into the step-by-step instructions, we wanted to make sure you understood these 2 things:
- There are only 2 ways to ride Tiana’s Bayou Adventure: via the virtual queue OR with Genie+.
- Since there is no standby line for Tiana’s Bayou Adventure. If you want to ride this attraction, you’ll need to be prepared to do something more than just show up to the park. You’ll need to either be ready to book a spot in the virtual queue (free) OR try to snag a spot using Genie+ (costs extra).
Here’s What You’ll Need to Begin:
Whether your plan is to try for a spot in the virtual queue OR you’re going to purchase Genie+ and attempt to get a spot there, you’ll have to get ready first.
No later than the night before:
- Make sure you have the My Disney Experience App
- Double-check your Friends and Family list to confirm everyone who should be there is showing up
- Also, confirm everyone in your party has a valid theme park admission (ticket).
- If anybody in your group has an Annual Pass, they also must have a valid Park Pass Reservation for Magic Kingdom OR a reservation for another park with a plan to hop to Magic Kingdom.
No later than 6:50 a.m.:
- If your plan is to purchase Genie+, you’ll need to buy that BEFORE 7:00 a.m. You can purchase it starting at midnight, so if you’re up that late for some reason, go ahead and grab it then. Otherwise, we recommend you have it purchased for all members of your party no later than 6:50 a.m. That leaves you with 10 minutes to get ready for the hectic 7:00 a.m. opening of the virtual queue and Genie+ spots.
Now that you’ve done that, let’s go over the steps for the virtual queue and for snagging a spot with Genie+. We’ll go over the free virtual queue, first.
How to get a Boarding Group (virtual queue) for Tiana’s Bayou Adventure
To ride Tiana’s Bayou Adventure without spending anything extra, you’ll have to secure a spot in the virtual queue.
If you’ve visited Walt Disney World in the past few years, you’re probably already familiar with this process, since it’s the same thing Disney used for other attractions like Guardian’s of the Galaxy: Cosmic Rewind and TRON.
The virtual queue is FREE, but you’ll need to understand how it works to snag a spot:
- Reservation: The first step in the Disney virtual queue system is to snag a reservation – or in Disney’s terms, a boarding group. We’ll go over that in more detail down below, but you’ll use the My Disney Experience app to join the queue. It’s like saying, “Hey, I want to go on this ride,” but instead of going to the ride and waiting in a long line, you do it through your phone.
- Virtual Waiting: Once you’ve joined the queue, you’re given a spot in line – but it’s all virtual. You don’t have to stand in a long line; you can go do other things instead.
- Notification: The Disney virtual queue system keeps track of the line for you and lets you know when it’s your turn (aka when your boarding group is called) by sending you a push notification to your phone. You can also use the app to check to see the status, too.
- Your Turn: When it’s your turn, you head over to the attraction. In most cases, you’ll have a 1-hour return window.
- Enjoy the Ride: Once you arrive, you’ll join the Virtual Queue Line, where you won’t walk right on, but you’ll definitely have a shorter wait.
BUT – this is where it gets stressful because boarding group spots are not unlimited in the virtual queue – and once they are gone, they are gone.
Boarding Group Drop Times
Disney opens up the virtual queue at set times throughout the day. Those are commonly referred to as “drop times.”
Remember: guests must have valid theme park admission and, when applicable, a theme park reservation for Magic Kingdom to join the virtual queue.
There are 2 (and sometimes 3) drop times for the virtual queue at Tiana’s Bayou Adventure:
- 7 a.m.: Can join from anywhere (onsite or offsite)
- 1 p.m.: Must be in Magic Kingdom to join (while Disney officially states guests must be INSIDE the park for the 1 p.m. drop, we’ve learned that as long as you’ve tapped into the park, you can try to join the virtual queue at 1 p.m. from anywhere)
- 6 p.m.: Only available to Deluxe Resort Guests, and only on nights when Magic Kingdom is hosting Extended Evening Theme Park Hours. More on how the 6 p.m. drop works.
Boarding Group Step-by-Step Instructions
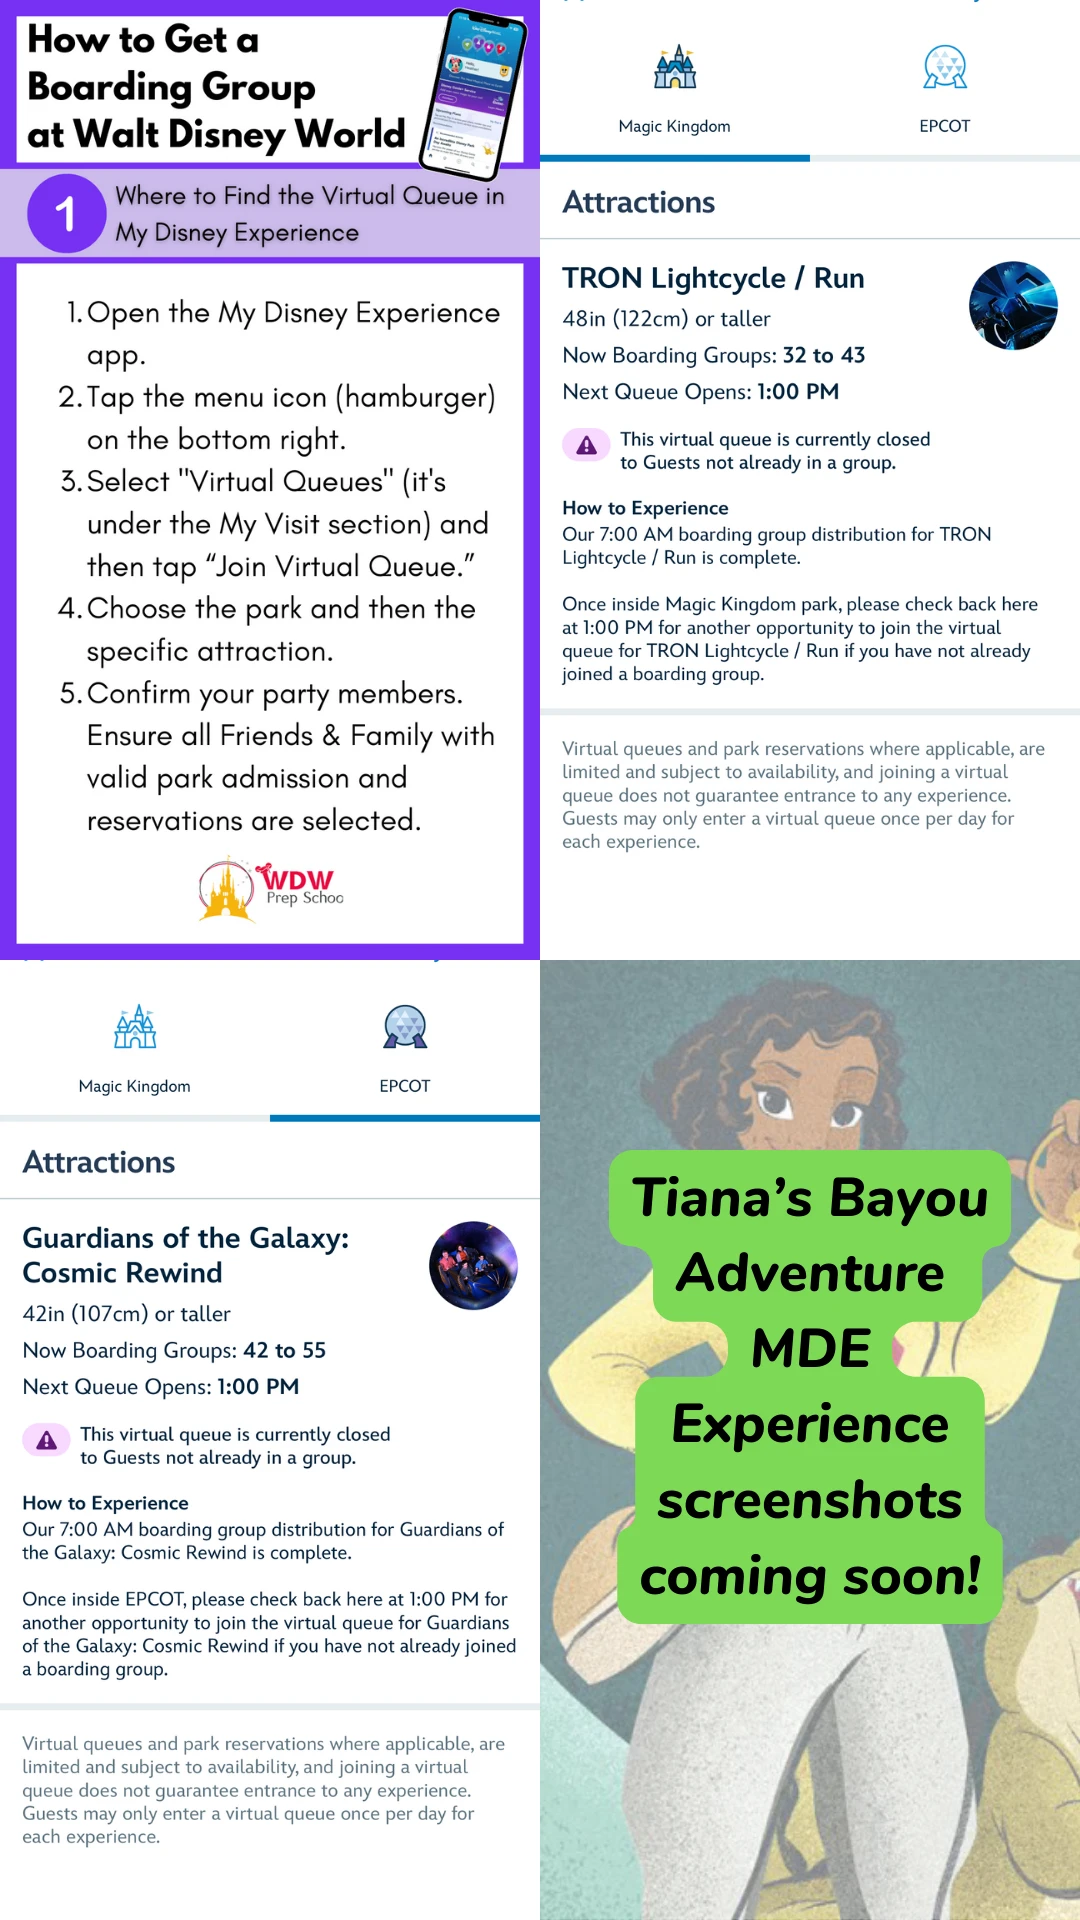
1. Where to Find the Virtual Queue in My Disney Experience:
- Open the My Disney Experience app.
- Tap the menu icon (hamburger) on the bottom right.
- Select “Virtual Queues” (it’s under the My Visit section) and then tap “Join Virtual Queue.”

- Choose the park and then the specific attraction.
- Confirm your party members. Ensure all Friends & Family with valid park admission and reservations are selected.
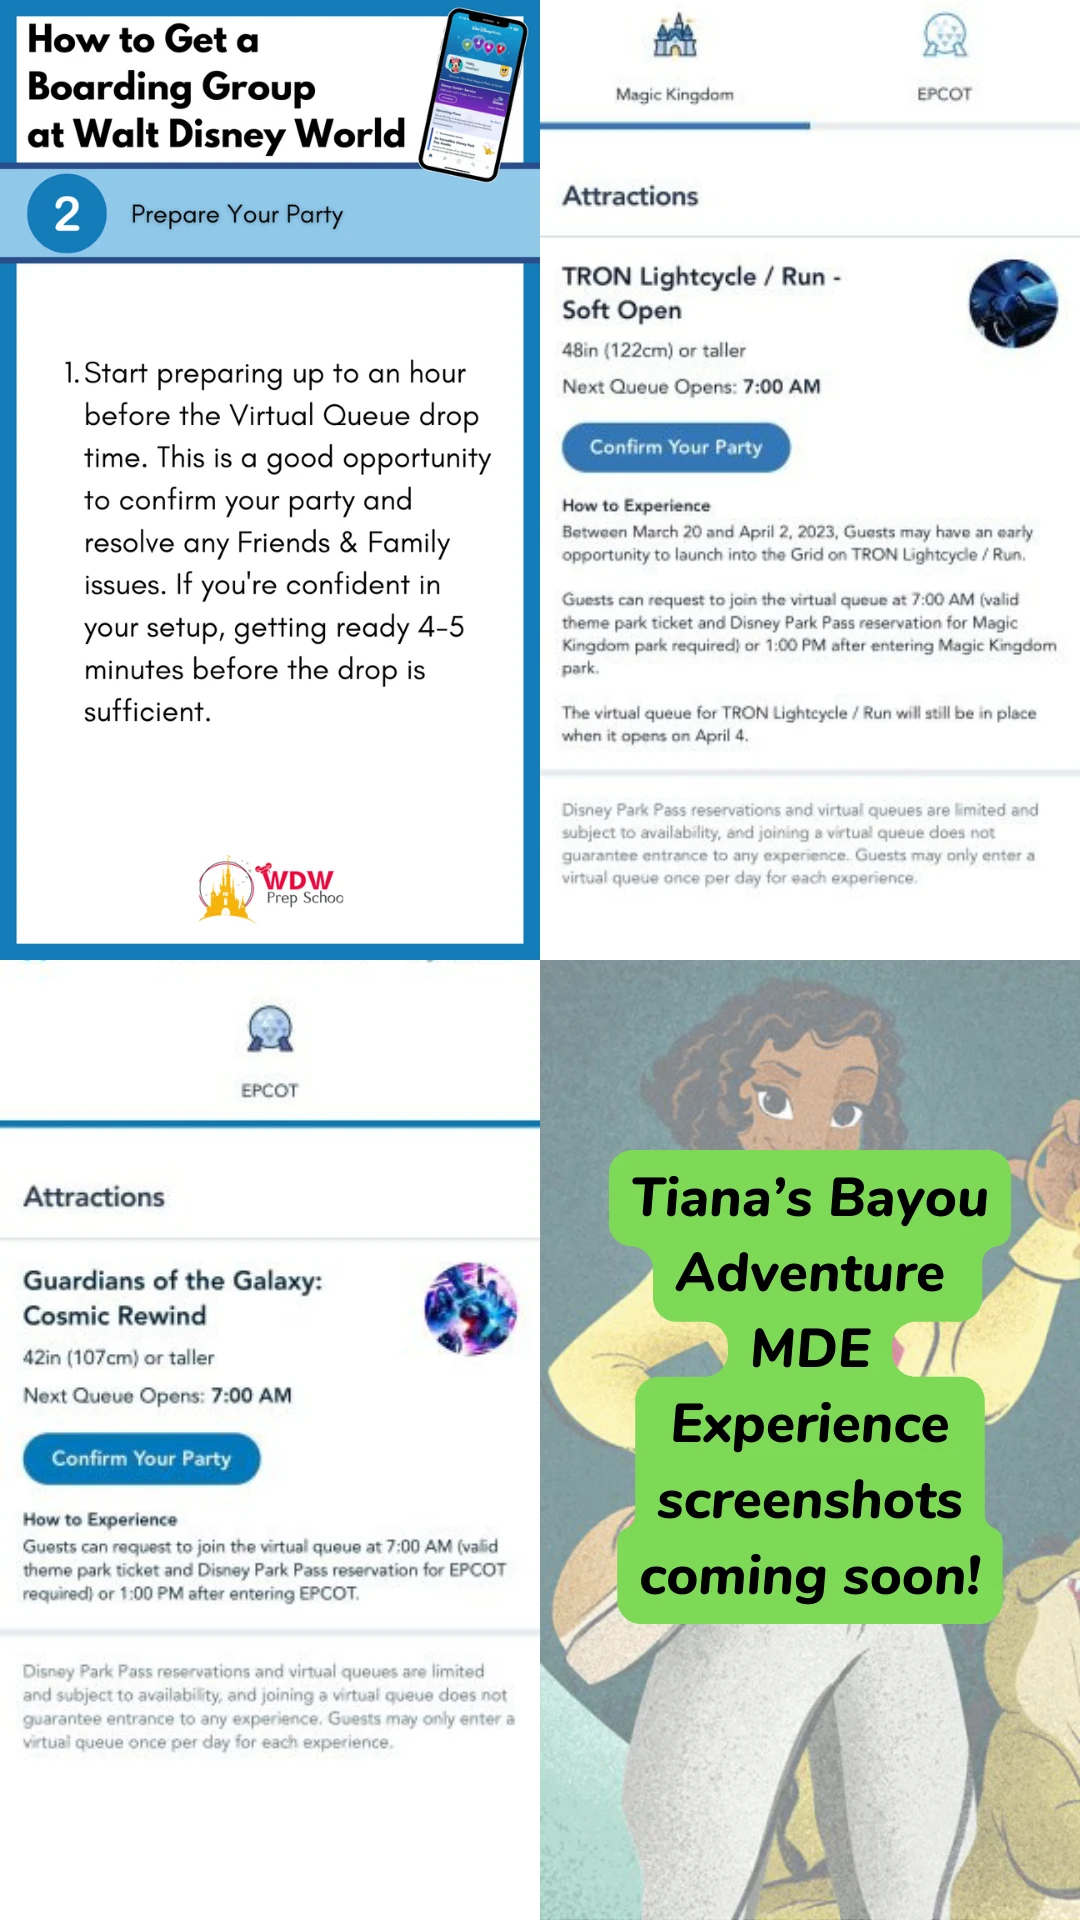
2. Prepare Your Party:
- Start preparing up to an hour before the Virtual Queue drop time. This is a good opportunity to confirm your party and resolve any Friends & Family issues. If you’re confident in your setup, getting ready 4-5 minutes before the drop is sufficient.
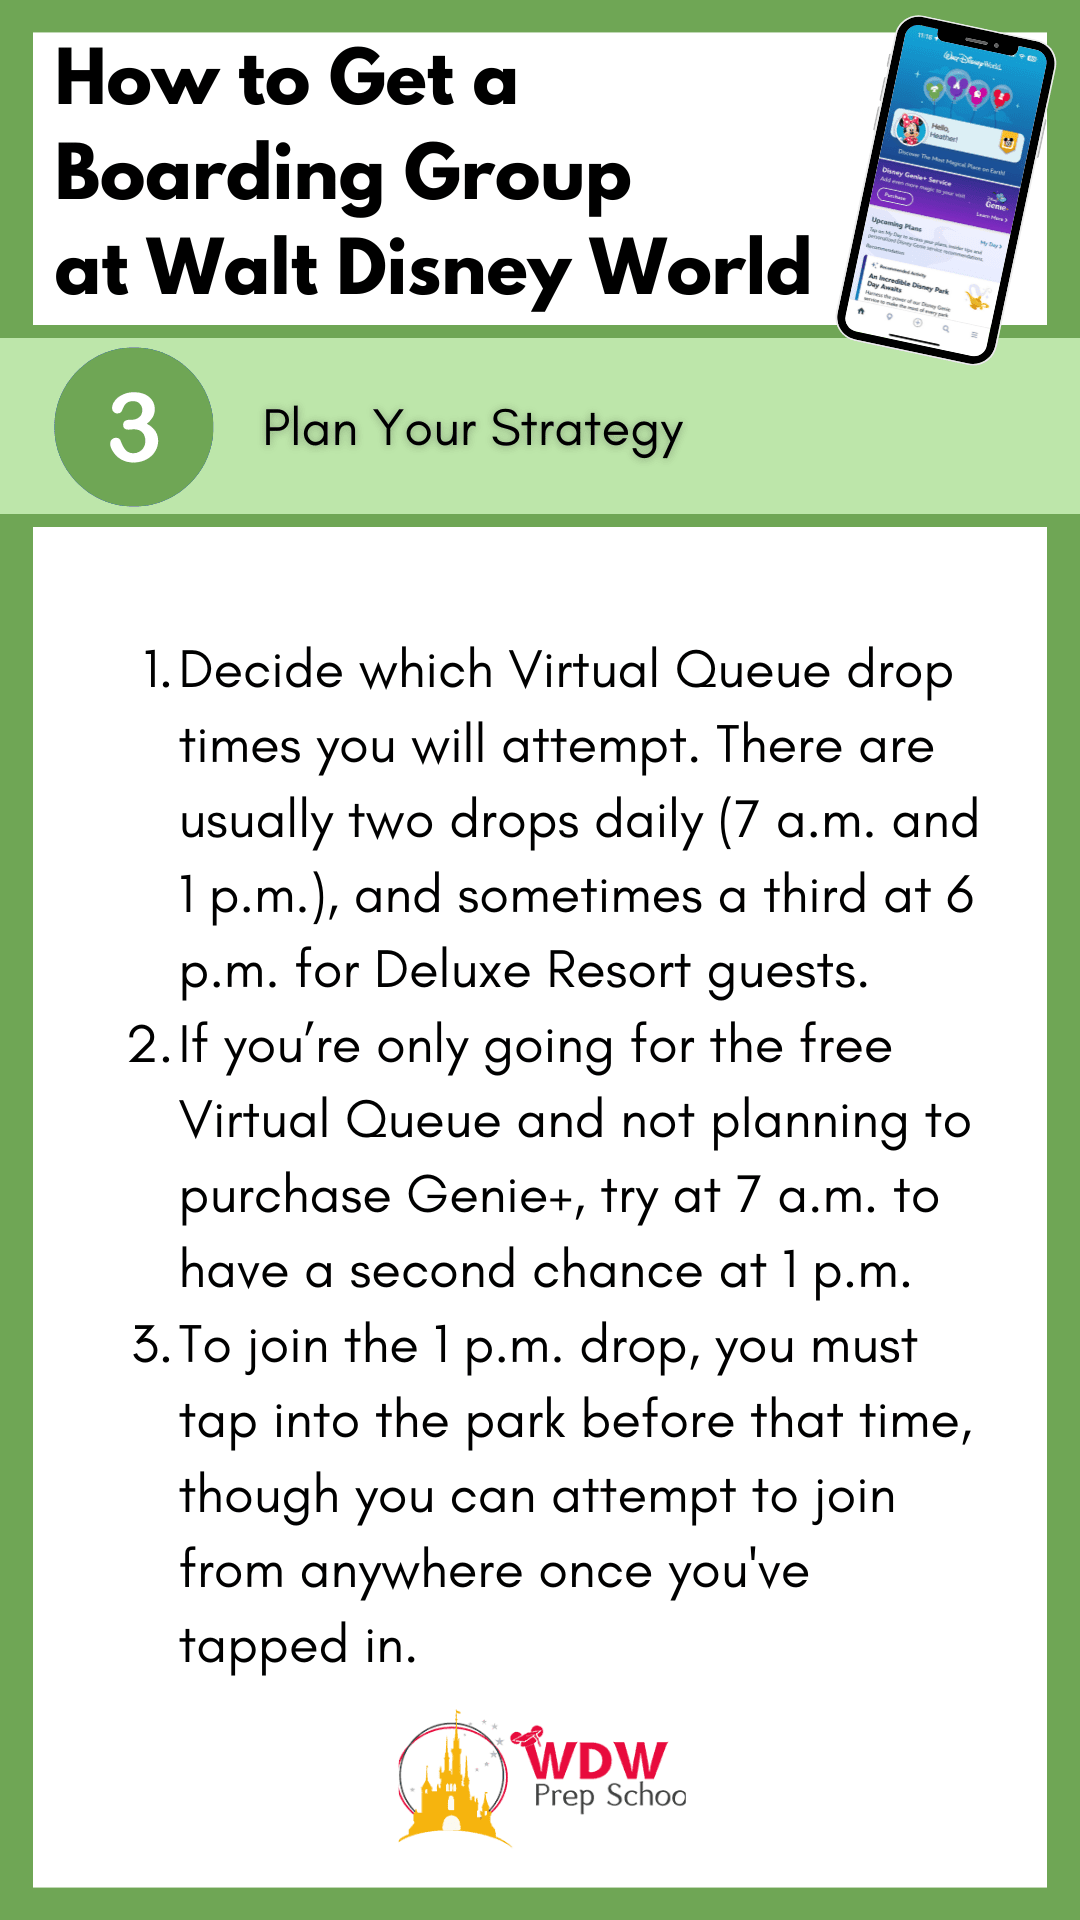
3. Plan Your Strategy:
- Decide which Virtual Queue drop times you will attempt. There are usually two drops daily (7 a.m. and 1 p.m.), and sometimes a third at 6 p.m. for Deluxe Resort guests.
- If you’re only going for the free Virtual Queue and not planning to purchase Genie+, try at 7 a.m. to have a second chance at 1 p.m.
- To join the 1 p.m. drop, you must tap into the park before that time, though you can attempt to join from anywhere once you’ve tapped in.
4. Divide and Conquer:
- If you have multiple people who can help, one person can handle the Virtual Queue while another secures a Genie+ reservation.
- If you’re the only one booking, prioritize securing your return time with Genie+ first, then try for the Virtual Queue at the 1 p.m. drop (if you miss out on the 7:00 a.m. one).

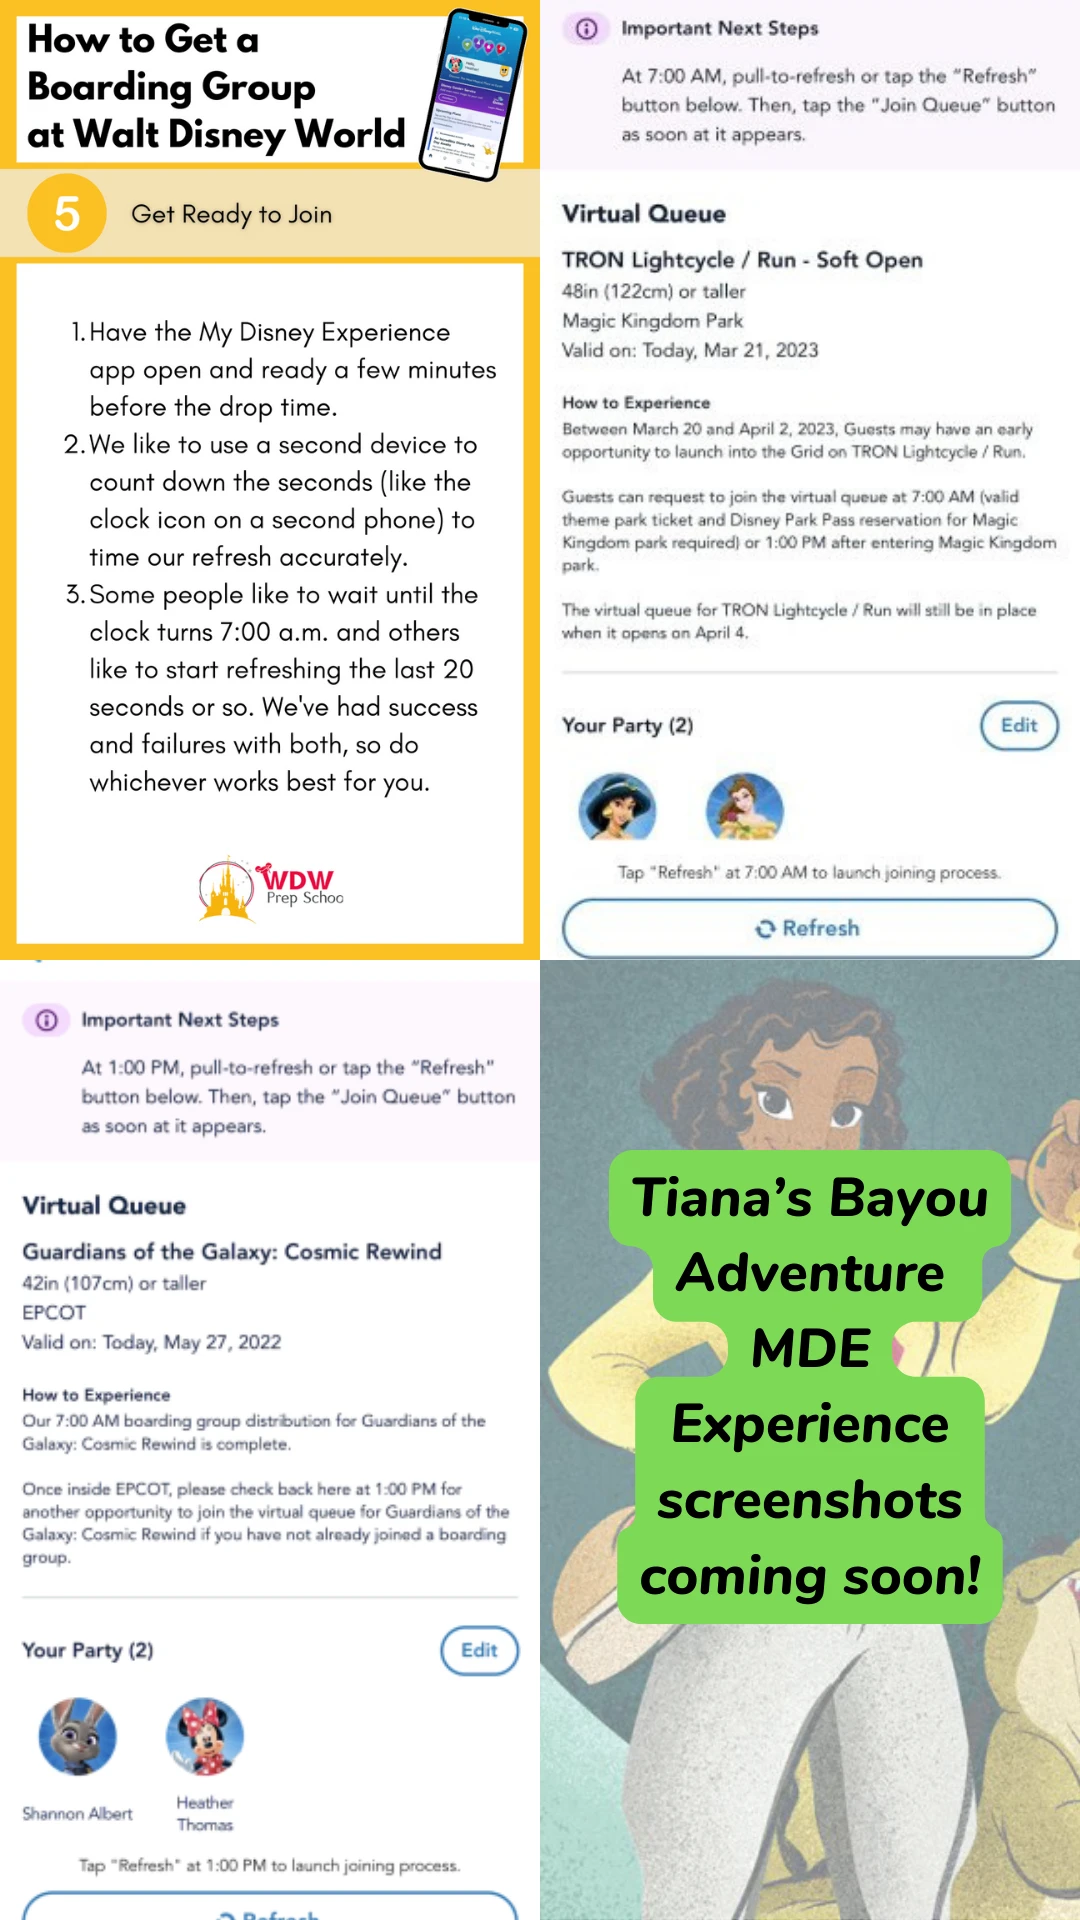
5. Get Ready to Join:
- Have the My Disney Experience app open and ready a few minutes before the drop time.
- We like to use a second device to count down the seconds (like the clock icon on a second phone) to time our refresh accurately.
- Some people like to wait until the clock turns 7:00 a.m. and others like to start refreshing the last 20 seconds or so. We’ve had success and failures with both, so do whichever works best for you.
6. Join the Virtual Queue:
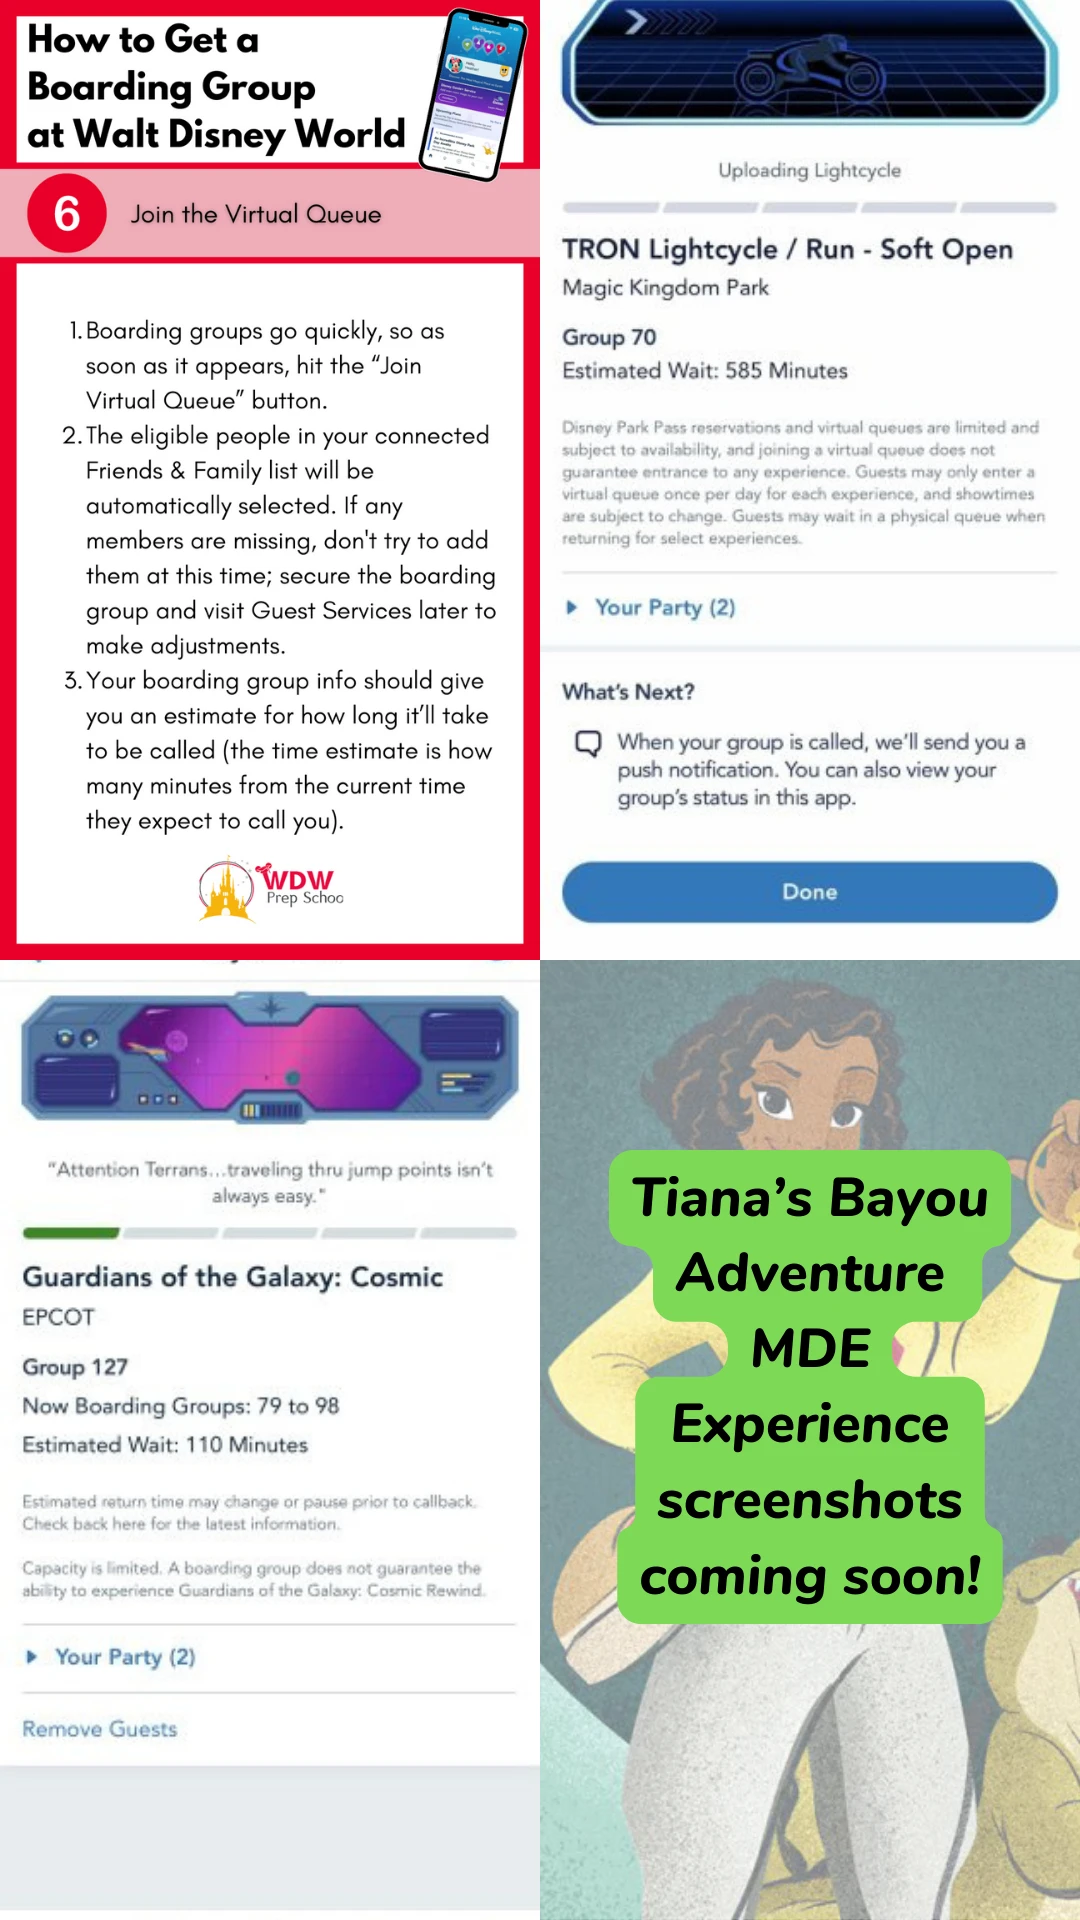
- Boarding groups go quickly, so as soon as it appears, hit the “Join Virtual Queue” button.
- The eligible people in your connected Friends & Family list will be automatically selected. If any members are missing, don’t try to add them at this time; secure the boarding group and visit Guest Services later to make adjustments.
- Your boarding group info should give you an estimate for how long it’ll take to be called (the time estimate is how many minutes from the current time they expect to call you).
7. Additional Tips:
- Ensure you have a strong WiFi or cellular signal. Consider using both if possible to improve connectivity OR test using one or the other. In some instances, you may have to change locations to get a better signal.
- If you have a conflict, such as a dining reservation, bring your receipt to the ride to explain any delays.
- If you find that some members don’t want a boarding group, don’t take time deselecting their names, as that will likely cost you the chance to get boarding groups.
How to ride Tiana’s with Genie+
Your other option for riding Tiana’s Bayou Adventure is with Genie+. To do that, you’ll first need to purchase Genie+, then at 7:00 a.m., you’ll try to snag a spot as fast as you can.
Remember – if you want to try to snag a spot in the virtual queue AND ride with Genie+, grab the Genie+ first and then go back to try to get a boarding group. If you miss out on the 7:00 a.m. boarding groups, you can try again at 1:00 p.m. (and sometimes, at 6:00 p.m.).
How to buy Genie+ (Step-by-Step Instructions)
No matter what kind of ticket you have, you can only buy Genie+ on the day of your visit through the My Disney Experience app, and it’s “subject to availability.”
If you are new to Genie+, Disney has how-to videos that can walk you through the steps.
When to Purchase:
- You can start buying Genie+ at midnight (12 a.m. EST) on the day of your visit.
- Genie+ does sell out, so the earlier you can buy it the better.
- We recommend purchasing Genie+ by no later than 6:50 a.m. That way you should be ready to go to try to snag your first Genie+ selection right at 7:00 a.m.
Here’s how to purchase it:
1. Open The My Disney Experience App
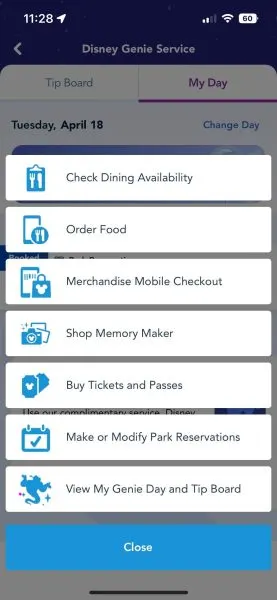
Hit the “+” at the bottom of the home screen and tap “View My Genie Day and Tip Board”.
2. Navigate To Tip Board Tab In Disney Genie
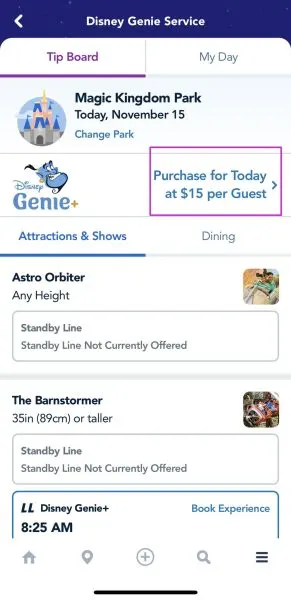
At the top, you’ll see a banner that reads, “Purchase for Today.” Click that.
3. Click Through This Disney Genie+ Prompt
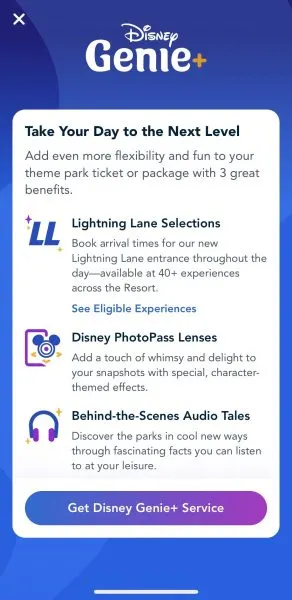
Click the button at the bottom of the screen to “Get Disney Genie+ Service”.
4. Confirm Your Party
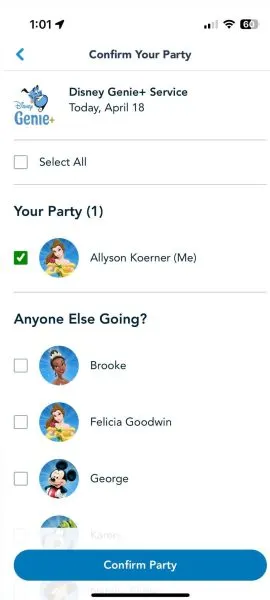
Select everyone you will be purchasing Genie+ for and then click the button at the bottom of the screen to “Confirm Party”.
4. Review Details
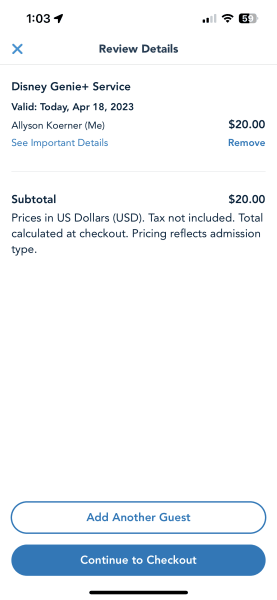
From here you can go back to add another guest, or you can continue to checkout.
Important: Not only do you need to make sure your travel party members are in your Family & Friends list, but they must have valid theme park admission and the same theme park reservation. Otherwise, their names won’t show up, and they won’t be able to be added to your Genie+ Lightning Lane selections.
5. Confirm Your Contact And Payment Information

On the payment screen, you’ll confirm your contact and payment information. If you would like, you can select a different payment method at the bottom of the screen. Once you are done, you’ll select “Purchase”.
How to make a Genie+ selection in the My Disney Experience app
1. Open The My Disney Experience App
Hit the “+” at the bottom of the home screen and tap “View My Tip Board and Day.”
2. Navigate To Your Tip Board In Disney Genie
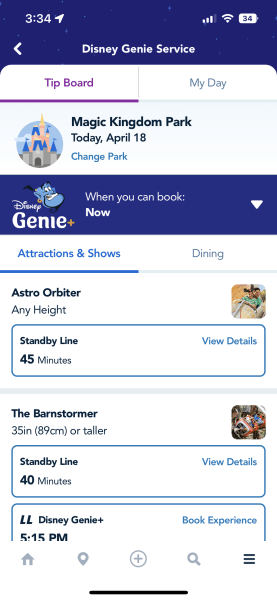
All Walt Disney World Resort guests can start making Genie+ Lightning Lane selections starting at 7 a.m.
When the booking window opens, navigate to your Tip Board in Disney Genie. You may need to pull down to refresh.
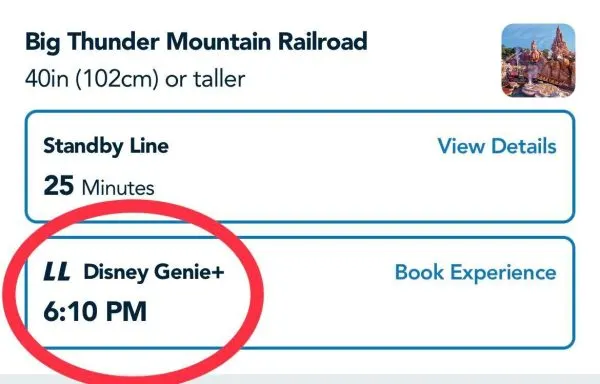
Note: The current window time available for Genie+ Lightning Lane selections is listed under “LL Genie+”
3. Make Sure You Are Looking At The Correct Park
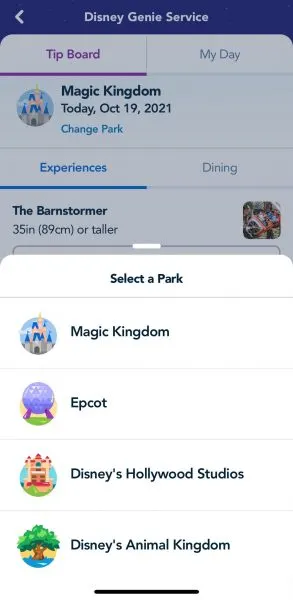
You can change the park you are viewing by tapping “Change Park” located at the top of the Tip Board directly underneath the park name listed.
3. Select Your Attraction
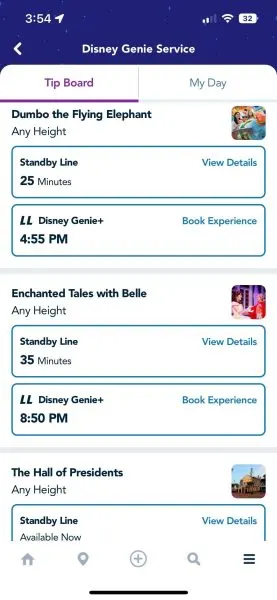
Note: The current window time available for Genie+ Lightning Lane selections is listed under “LL Genie+”
4. If Necessary, You Can Edit Your Party At This Time
You can either add or deselect guests. Once finished, select “confirm party”.
Important: Not only do you need to make sure your travel party members are in your Family & Friends list, but they must have valid theme park admission and the same theme park reservation. Otherwise, their names won’t show up or they won’t be able to be added to your Genie+ selections.
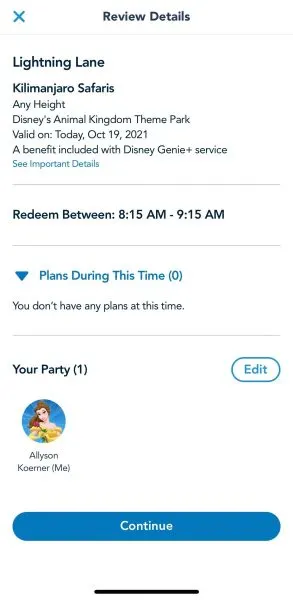
5. Review the Details
You can either add or deselect guests. Once finished, select “confirm party”.
Important: Not only do you need to make sure your travel party members are in your Family & Friends list, but they must have valid theme park admission and the same theme park reservation. Otherwise, their names won’t show up or they won’t be able to be added to your Genie+ selections.
Be sure to check your existing plans (tap the arrow next to “Plans During This Time”) so you don’t have too much of an overlap of selections.
If you have a Park Hopper, you can purchase Genie+ Lightning Lane selections at parks other than where you have a park reservation. Keep in mind that you have to do it after 2 p.m., when park hopping begins at Disney World. Once you’ve confirmed your party, you can review the details and hit “continue” to lock in your booking.
6. Reservation Confirmed
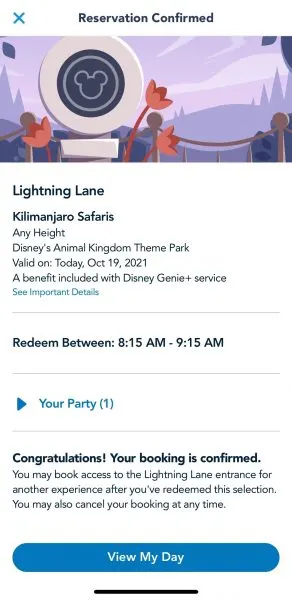
You’re all set. You can go to “View My Day” or hit the “x” to exit.
Where to Find Genie+ Reservations in My Disney Experience
If you’ve already made a reservation, here’s how you can see what you have:
On the My Day Tab
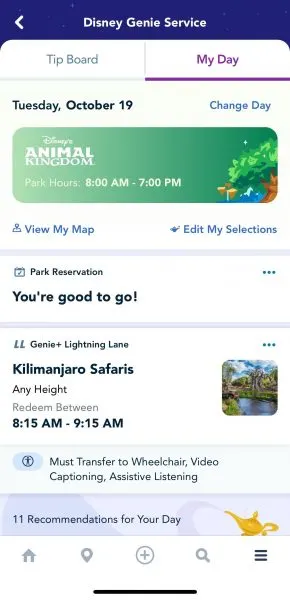
Navigate to the My Day tab inside of Disney Genie.
There you’ll find any plans you’ve made, including Advanced Dining Reservations, Park Pass reservations, and Genie+ reservations.
On the Tip Board Tab
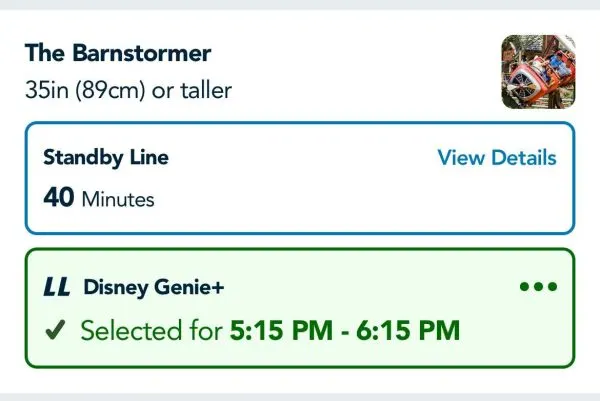
If you don’t have any Genie+ reservations, the tip board will look like this:
But when you have a Genie+ reservation, you’ll see the attraction highlighted, like this:
On the Main Page of the My Disney Experience App
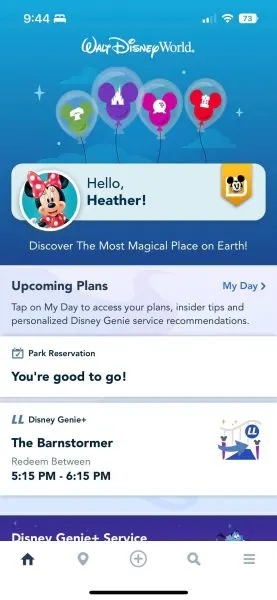
You’ll also be able to see your reservations on the main page of the My Disney Experience App.